How to Export in DaVinci Resolve: A Complete Step-by-Step Guide
If you're using DaVinci Resolve to edit and colour grade your project, the final step is crucial: exporting it properly. Knowing how to export DaVinci Resolve projects ensures your film or video looks just as polished after rendering as it does on your timeline.
In this step-by-step guide, we’ll walk you through the full process of how to export in DaVinci Resolve—whether you’re delivering for YouTube, clients, festivals, or creating a master file.
1. Navigate to the Deliver Page
Once your edit and grade are complete, head to the Deliver page—found at the bottom of the DaVinci Resolve interface. This is where all export settings live.
2. Choose the Custom Export Tab
On the top left of the export tab, you’ll see several export presets:
YouTube
Vimeo
H.264 Master
Final Cut Pro / Premiere XML
Custom Export
💡 For this guide, we’re choosing Custom Export to give you full control over your DaVinci Resolve export settings.

How to export in DaVinci Resolve settings screen
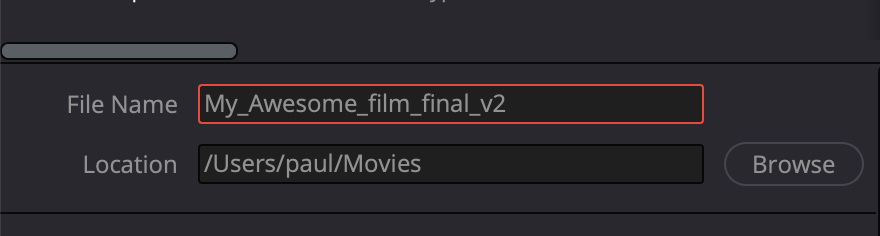
3. Set Your File Name and Destination
Under the Render Settings panel, click Browse and choose where your exported file will be saved. Use a clear, versioned file name like:
MyAwesomeFilm_Final_v2
4. Select Format and Codec
Under the Video tab, you’ll see two drop-down menus: one for Format and one for Codec.
Recommended export formats in DaVinci Resolve:
QuickTime (.mov)
MP4
Personally, I would export Quicktime for everything in Davinci Resolve , except if you have been asked for an MP4 specifically, some film festivals want this codec for showing on screen, also I’ve had a few clients asked for MP4 for viewing purposes and use Exporting for Film Festivals.
TIFF
If you are wanting still images, then Tiff files is the best format to export in davinci resolve - just be sure to select RGB 16 bits in the Codec drop down!
Mastering
If you're exporting a master version in DaVinci Resolve, QuickTime with Apple ProRes is ideal. When you choose Apple ProRes, you’ll unlock a third menu for selecting the ProRes type (e.g. 422, HQ, 4444XQ).
Did you know?
A 10-minute export in DaVinci Resolve at 4K 4444XQ can be nearly 120GB, while a 1080p ProRes 422 export might be just under 9GB. Full-length film masters can reach 1TB—totally normal for high-end delivery!
If you're exporting for a film festival, always follow their technical requirements exactly. Many require specific resolutions, frame rates, and codecs. Bitrate calculators (you can find a good one here ) can help you meet the file size limits.
5. Set Resolution and Frame Rate
In most cases, DaVinci Resolve will automatically match your export resolution and frame rate to your timeline settings.
Resolution: Only adjust this if your delivery resolution is different.
Frame Rate: This may be greyed out. Only change it if you have a specific reason!
Best practice: Change resolution in the timeline settings before exporting, not in the Deliver page, there are exceptions to this, but you will know if you need to make this exception!
6. Adjust Audio Settings in DaVinci Resolve
Don't forget the audio! It’s a common mistake.
Go to the Audio tab and make sure Export Audio is checked.
Recommended audio settings:
Format: AAC (for web) or Linear PCM (for mastering)
Bitrate:
AAC: 320 kbps
PCM: 24-bit / 48 kHz
This ensures your final DaVinci Resolve export sounds as good as it looks.
7. Add to Render Queue and Export
Once you’re happy with all your settings:
Click Add to Render Queue
On the right side, click Start Render
DaVinci Resolve will begin exporting your project immediately.
8. Pro Tips for Exporting DaVinci Resolve Projects
✅ Test before committing
Export a short section of your timeline first to make sure everything looks and sounds right.
✅ Use In/Out Points
Only want to export part of your timeline? Use the Render In/Out Range option—especially helpful when exporting TIFF sequences. Otherwise, you might end up with thousands of frames exported!
✅ Washed-out exports?
If your video looks flat after export, check your colour space and gamma tag under Advanced Settings, we will take a deeper dive into the gamma shift ‘problem’ in a later tutorial but in the mean time, if you are export in DaVinci Resolve, use these settings;

Export davinci resolve gamma shift settings
Conclusion
Learning how to export in DaVinci Resolve is an essential skill—just as important as editing or grading. Whether you're uploading to YouTube, sending a client preview, or delivering a festival master, your export settings can make or break the final product.
Now that you know how to export DaVinci Resolve projects like a pro, you're ready to render with confidence and deliver your work at its best.