What is Shot Matching? – How to Match Shots in DaVinci Resolve
Introduction
There are plenty of YouTube tutorials showing how to match shots to a still from ShotDeck or other professional references. But what happens when you’re working with real-world footage from a lower-quality camera — say a Sony A7 or DJI Osmo Adventure — instead of an ARRI Alexa or RED Raptor?
In this post, we’ll break down what shot matching is and walk through how to match shots in DaVinci Resolve, even when working with low-quality clips. The goal is to share practical best practices that don’t rely on heavy noise reduction, while still protecting the integrity of your image.
What is Shot Matching?
Shot matching is the process of making two or more clips look consistent in terms of exposure, colour balance, contrast, and saturation. It’s a key part of colour grading because mismatched shots distract viewers and pull them out of the story.
There’s no single “right way” to match shots, but the workflow I use speeds things up: build a look first, then match your other clips to that look. This avoids unnecessary back-and-forth adjustments and makes it easier to maintain consistency in elements like skin tones.
If you’d like to follow along step by step, the full video tutorial is linked at the bottom of this post.
Step 1: Normalise Your Footage
The first step in shot matching in DaVinci Resolve is to normalise your clips. My example footage is shot in Sony Log, but your process may differ:
Blackmagic → use Blackmagic Film / CST
Panasonic → use V-Log
Canon → use Canon Log
I prefer to work in an intermediate space like ARRI LogC, though DaVinci Wide Gamut is another solid option. To transform to display space, I use ARRI LUTs directly from their website. (You can check out my separate blog post for more on why this workflow works for me.)
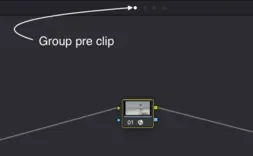
💡 Tip: Apply this at the pre-group level. In fact, this is usually the only node I use in pre-group.
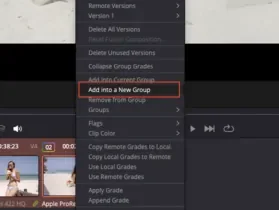
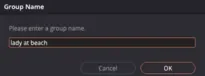
Step 2: Group Your Clips
Grouping clips is a great way to speed up workflow. Highlight your timeline clips, right-click, and create a Group. You can name the group however you like. This makes it easy to apply grades across multiple clips at once.

Step 3: Apply a Look to the Hero Shot
Next, select your hero shot — the clip with the best exposure and colour values. At the post-group level, I use a simple node tree:
Node 1: Contrast
Node 2: Colour balance
Node 3: Saturation
Node 4: LUT (I’m using the Arri LogC from the Arri website in the linked tutorial)
With the hero shot set, you now have a visual anchor for the rest of your sequence.
Step 4: Match the Other Clips
At the clip level, match your second shot to the hero shot using the same node structure:
Adjust exposure until it sits comfortably beside the reference.
Balance shadows — the human eye is especially sensitive to shadow detail. For example, neutralising red casts in shadows will make two clips feel more alike.
Fine-tune colour balance across highlights, mids, and shadows.
Check saturation levels so skin tones, skies, and key colours align.

What is shot matching -Before and after hero shot
Step 5: Use Secondary Corrections
For finer control, add a parallel node for secondary adjustments using the presets under color tab at the top:
Skin tones: Select red/orange hues and refine for consistency.
Skies: Target blue to keep skies aligned.
Green elements: Adjust foliage or water for natural balance.
Step 6: Adjust Hero Shots When Necessary
When working with lower-quality footage, sometimes the clips you’re matching to your hero shot break under correction — for example, skies may clip or fall apart. Don’t be afraid to adjust the hero shot itself to match back to other clips.
The ultimate goal is cohesion across the timeline, not rigidly sticking to one reference.
View the ‘What is Shot Matching? – How to Match Shots in DaVinci Resolve’ video here!
Conclusion
So, what is shot matching? It’s the art of making your footage consistent, natural, and cohesive across edits. In DaVinci Resolve, the process is straightforward: normalise your footage, group your clips, set a hero shot, build a look, and then match every other shot to it — refining with secondary corrections as needed.
While this sounds simple, it takes practice, a good eye, and a calibrated reference monitor to do well. And remember: when working with lower-quality footage, flexibility is key. Sometimes the “hero” needs to bend to make the sequence flow.
Have a project that needs an amazing finish? get in contact for a free no-obligation chat about your project.