How to Match Clips in DaVinci Resolve. Dealing with Overexposure
Introduction
Overexposure can be one of the trickiest issues you’ll face. Bright skies, blown-out highlights, and inconsistent exposures between shots distract from the story. The good news: DaVinci Resolve gives you the tools to fix overexposed footage and match clips so the whole sequence feels consistent and cinematic.
In this guide, we’ll walk step by step through dealing with overexposed footage in Resolve—often the first move when you’re learning how to match clips in DaVinci Resolve.
Step 1: Assess Your Footage
Before jumping in, compare your clips side by side using the waveform scopes this will help you identify which clips are overexposed and losing highlight detail and also allow you to find a starting point on where you want the exposure to be.
The Waveform and Parade scopes help you spot overexposure and set a target exposure.
Pick a Reference Clip: Choose a well-exposed shot to guide your matching.
If you don’t have one follow the steps below.
👉 Pro tip: If you’re newer to scopes and exposure controls, check out my guide on Lift, Gamma, Gain & Offset in DaVinci Resolve.
Step 2: Bring Exposure Back Under Control (HDR Offset)
Start with the HDR Global wheel to lower overall exposure. It’s photometrically correct and lets you work in stops, and will allow you adjust the exposure in a similar way to how the camera would adjust the exposure on set.
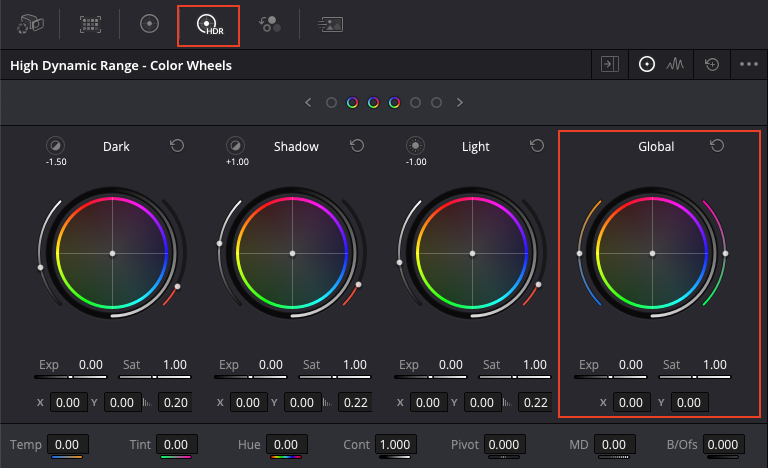
Note: the way exposure works is Doubling the light, or in this case captured light, equals one stop up. For two stops is double ×2, three stops is ×4, four stops is ×8 etc.
If texture in skies, skin, or bright objects reappear, you’ve got room to work.
If not, those areas are truly clipped—you’ll need to get creative, which we will cover in a later blog but is beyond the scope of this one.
Step 3: Check the Correction with Contrast and Pivot
Using contrast and pivot will allow you check to see if you have balanced the shot to mid grey.
In the example in the youtube video below we are working with LogC footage,
For LogC footage, mid-grey is 39% (0.390 in Pivot).
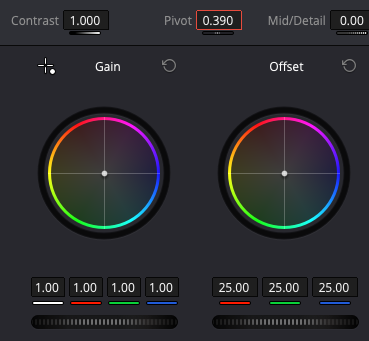
On the scopes, this reads as 400 on the 10 bit scale - as the scale is 0-1023.4)
If the image is balanced correctly, pixels above and below the mid-grey point move evenly. This is needed to be done by eye and with practice you’ll be able to do this accurately and quickly.
You can use Contrast to breathe more life into the image or use it to simply double-check your correction—the choice is yours!
Step 4: Match Clips in DaVinci Resolve
Now it’s time to align your overexposed shot with properly exposed ones.
Use still images saved into your gallery or select multiple clips to compare waveforms.
Adjust Lift and Gain to bring the high and low points into line.
Check skin tones: use the Red Vector on the Vector scope to fine-tune them. (check out the How to Match Clips in DaVinci Resolve tutorial below for a deeper dive on how to do this!)
Pro Tips for Success
Work in separate nodes: Keep exposure fixes, colour matching, and creative looks separate.
Use gallery stills: Save a properly exposed frame and compare with Split Screen > Selected Stills.
Always work on a calibrated monitor: This ensures accuracy across devices.
Dealing with overexposure in DaVinci Resolve isn’t just about saving a single clip
It’s about keeping your entire sequence consistent. With the steps above, a little practice, you’ll be able to fix overexposed footage, match clips effectively, and deliver a polished, cinematic grade.
If you’ve got a project that needs professional colour grading, get in touch—I’d love to help bring your vision to life.