How to Colour Grade in DaVinci Resolve: A Beginner’s Guide
Set Up Your First Colour Grade with Confidence
Learn how to colour grade in DaVinci Resolve with this beginner-friendly guide. Discover the tools, workflow, and techniques to set up your first professional-looking grade with confidence.
Why Colour Grading Matters
If you're just starting out as a filmmaker, videographer, or editor, learning how to colour grade in DaVinci Resolve is one of the smartest creative skills you can develop. Colour grading isn’t just about making your footage look “nice” — it’s about enhancing emotion, defining visual tone, helping tell your story, and connecting more deeply with your audience.
DaVinci Resolve is the industry-standard colour grading software used on everything from indie films to Netflix originals. And the best part? It’s free to start — which is kind of unbelievable for a tool this powerful!
This guide will walk you through the essential steps to set up your first colour grade in DaVinci Resolve, even if you’ve never opened the software before.
Step 1: Set Up Your Project Correctly
✅ Start with the Right Settings
Before you even touch the Colour page, it’s important to set up your project properly.
Open DaVinci Resolve. You’ll land in the Project Manager.
In the bottom-right corner, click New Project, give it a name, then click Create.
Resolve will open, usually in the Cut page by default.
Next, switch to the Media page (you’ll find this tab at the bottom of the interface). This is where you’ll bring in and organise your footage.
✅ Import and Organise Your Media
In the Media tab, look to the left under Master, right-click and choose Create Bin.
Name this bin something like Footage.
Drag and drop all your clips into this bin.

setting up a project in davnici resolve
Now, switch to the Edit page (the third tab from the left). In the top-left panel, you’ll see the bin with your imported footage.
Go ahead and create your timeline using the clips you want to grade.
Side note: If you’re bringing in a project from an editor, you’ll want to check out my upcoming post on how to import timelines into DaVinci Resolve from other NLEs.
Step 2: Understand the Colour Page Layout
Once your edit is locked and your timeline looks clean and polished, it’s time to move into the Colour page — this is where the magic happens.
The Colour page in Resolve may look intimidating at first, but once you understand its layout, it becomes your creative playground:
Viewer (top centre): This is where you view your footage.
Node Graph (top right): Nodes are where your grade lives — each one does something different.
Primary Wheels (bottom centre): This is where you adjust Lift (shadows), Gamma (midtones), Gain (highlights), and Offset (overall exposure).
Scopes (bottom left): Tools like Waveform and Vectorscope help ensure accuracy in exposure and colour.
Clips Timeline (middle bottom): Allows you to jump between shots for comparison.
Side note: Above the Node Graph are two dots — one for Clip-level grading (left) and one for Timeline-level (right). For this blog, we’re working on a clip-by-clip basis, so keep that left dot selected.
Do feel free to go in there and experiment though — and to give you an idea of how it works: whatever adjustment you make at the timeline level will apply after the final adjustment at clip level across all of the clips.
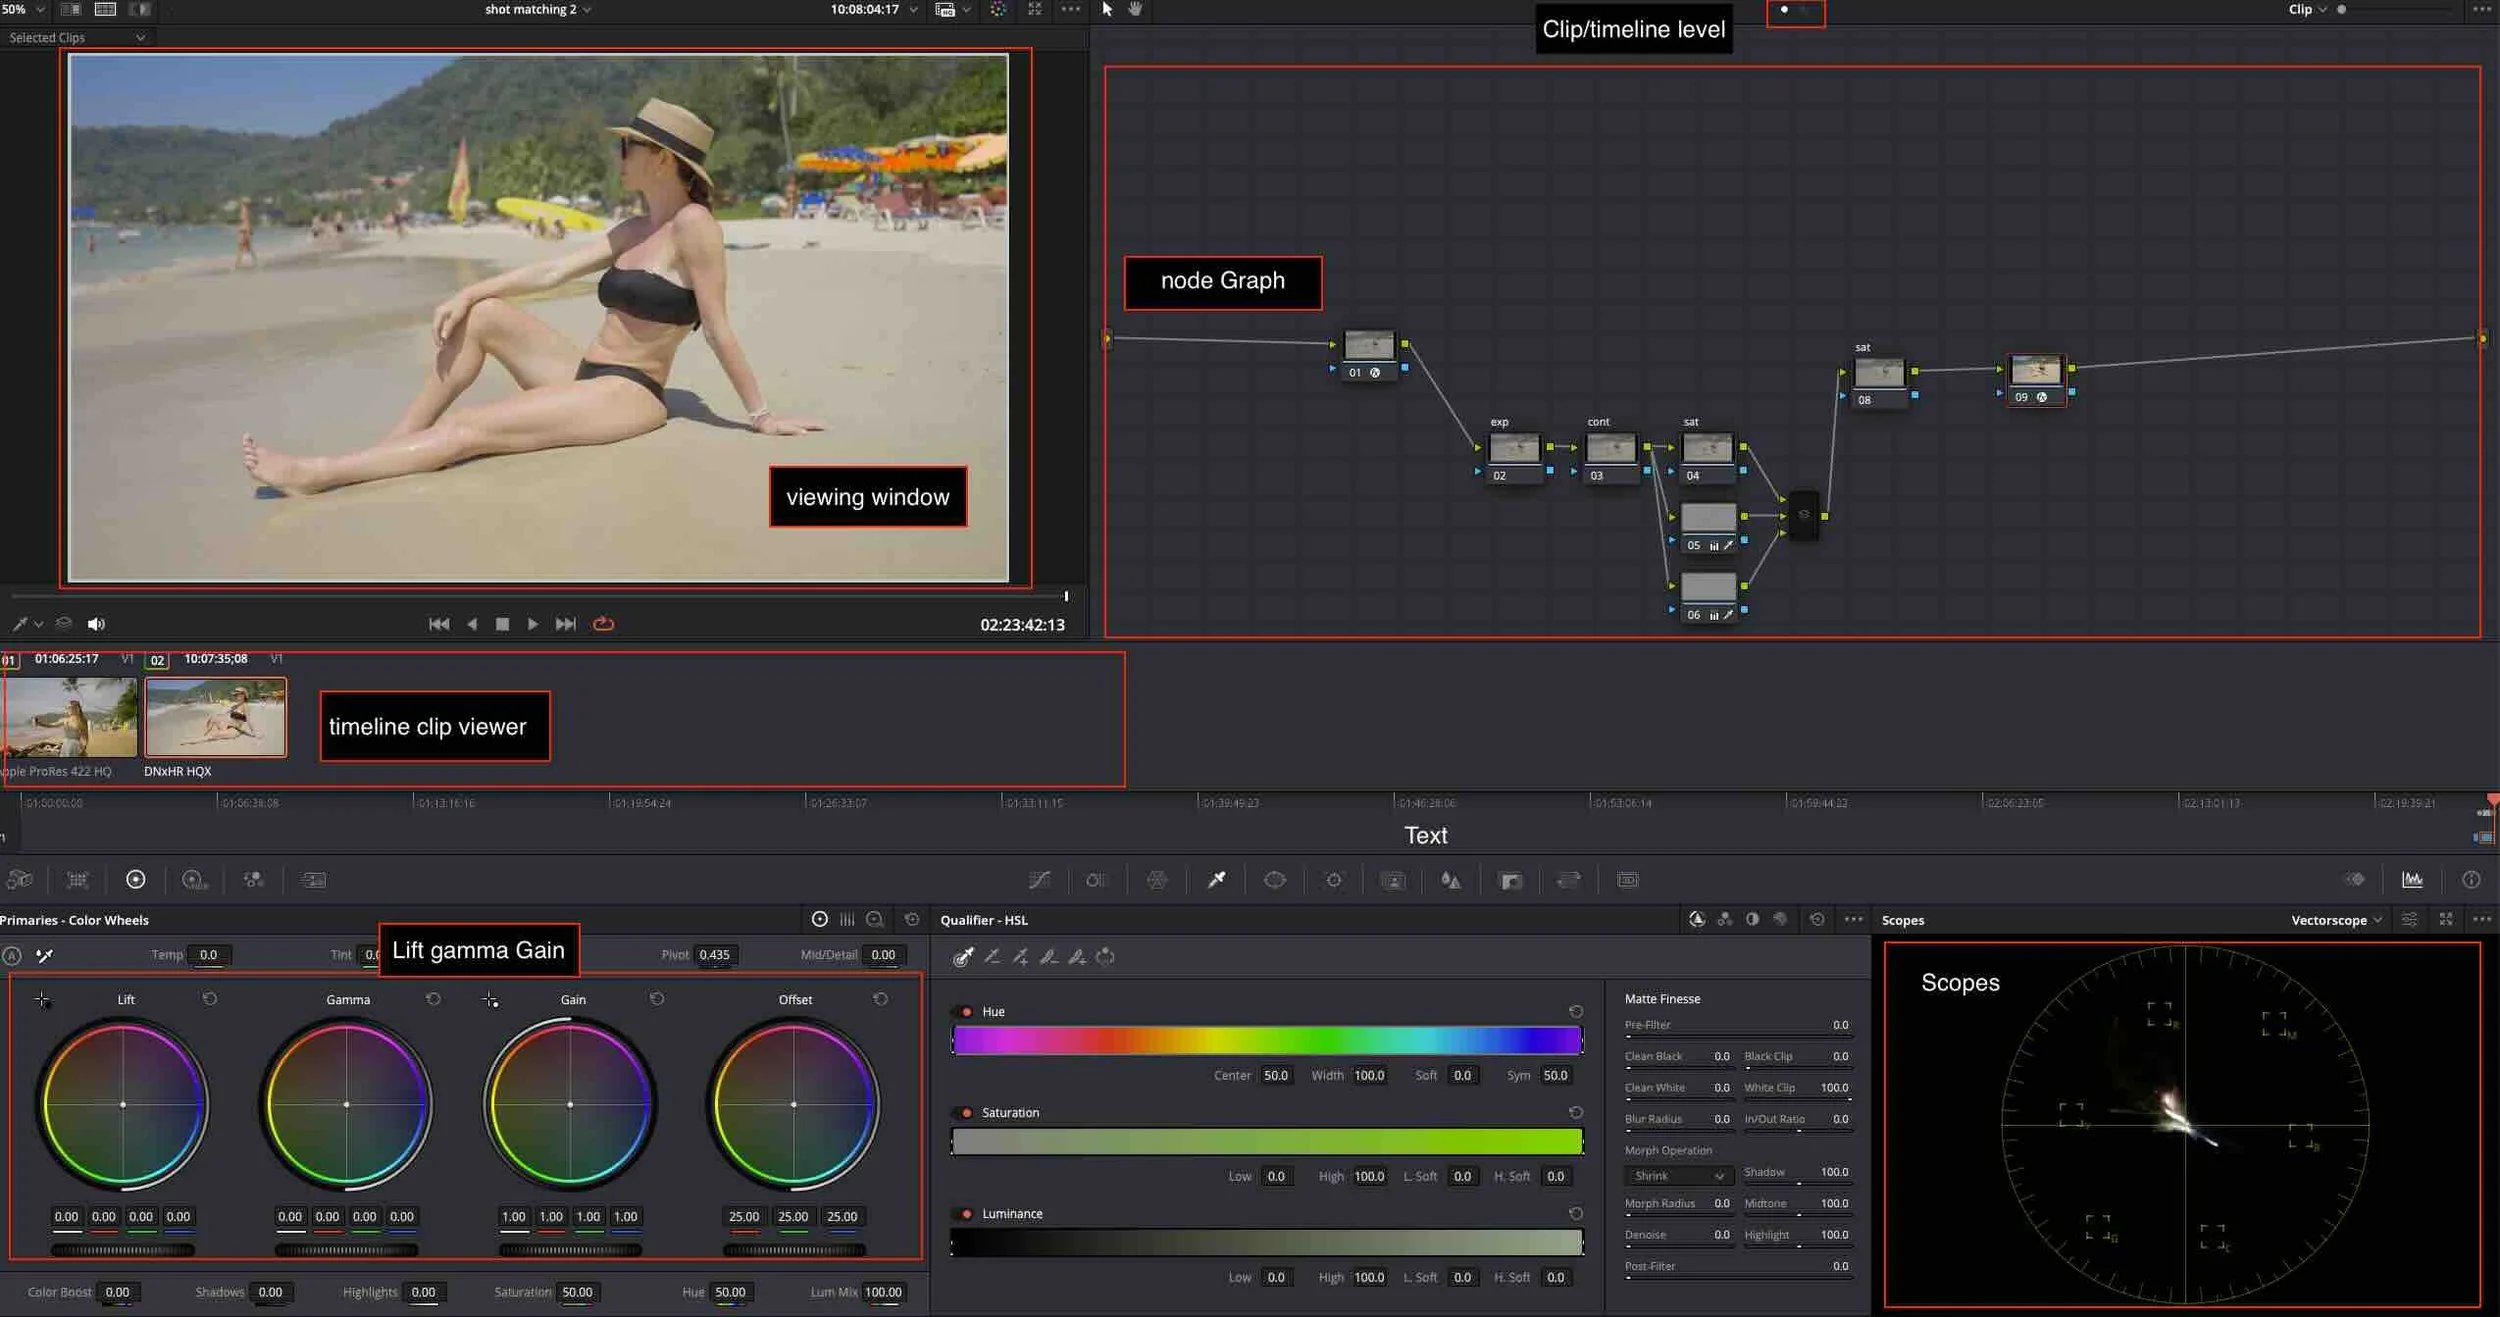
Davinci resolve colour page
Step 3: Build a Logical Node Structure
Nodes are what set DaVinci Resolve apart from other editors. Think of nodes like layers — each one handles a specific part of your grade, giving you control and flexibility.
Here’s a simple node setup which forms the basis of all of my professional projects:
Recommended Starter Node Tree:
Node 1 – Exposure or Contrast Adjustments
Contrast is the difference between the darkest and lightest parts of your image.Node 2 – Balance
This doesn’t always mean white balance — it depends on your creative intent and how the footage was shot.Node 3 – Saturation Adjustments
Bring your image to life, but stay tasteful.Node 4 – Power Windows (Masks)
Ideal for isolating parts of your image for secondary grading.Node 5 and 6 – Creative Effects
Add grain, halation, softening, sharpening, etc.
Use Alt + S (or Option + S on a Mac) to add a new serial node. Label each node so you stay organised as your grades get more complex.
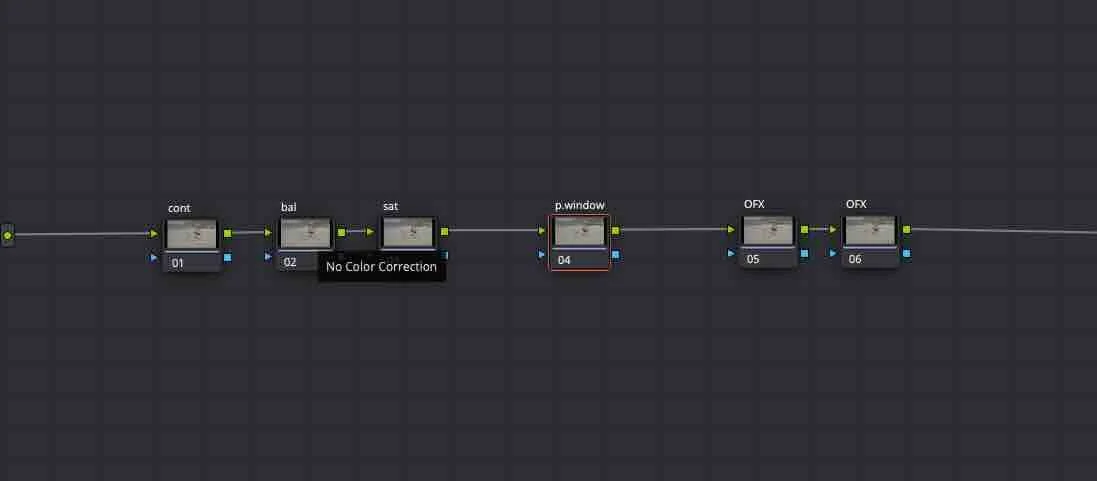
Node tree in davinci resolve
Step 4: Review and Match Across Shots
This step is all about consistency.
Use this exact node structure for every clip, and if you have to make any adjustments, you know you're going to make the adjustments in the exact same place in the exact same way.
Use the Gallery to save a still from one clip, then apply the grade to others using Grab Still and Apply Grade.
Compare shots using the Parade and Vectorscope — these tools help ensure your skin tones and colour balance remain consistent.
Don’t just rely on your eyes — use the scopes to guide you.
Matching clips shot under different lighting conditions is one of the biggest challenges in grading, but with practice, it becomes second nature.
Step 5: Export Your Project
Once you’re happy with your grade:
Head to the Deliver page
Give your project a file name
Choose the Format and Codec you want
Click Add to Render Queue, then Start Render
For a full, step-by-step export guide on how to colour grade in DaVinci Resolve and render your final project, check out my blog post: How to Export in DaVinci Resolve
Final Thoughts: Your Colour Grading Journey Starts Here
Learning how to colour grade in DaVinci Resolve can feel overwhelming at first — but it gets easier with every project. The more you practice, the more confident you'll become, and before you know it, you’ll be building your own grading style and techniques.
There’s no single "correct" way to grade — and that’s the beauty of it. The structure I’ve shared here is a solid foundation, and it’s one I still use every day. I’ve added to it over the years, but these six basic nodes will take you surprisingly far.
Keep practicing, stay curious, and don’t be afraid to experiment. You’ve got this.